

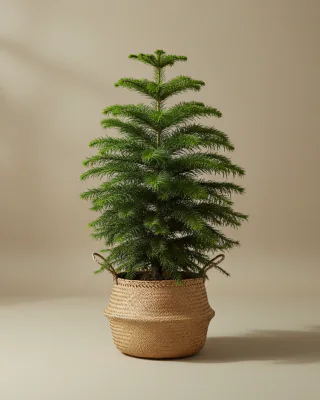
Norfolk Island pine care guide
Araucaria heterophylla
Quick answer
Water your Norfolk Island pine when the top 3 cm (1.2 in) of soil feel dry to the touch. In summer that’s typically every 6 to 8 days.
 Not sure it’s this plant?Check yours with a photo, free
At a glance
- Light
- Bright light, some sun
- Typical interval
- Every 6 to 8 days · summer
Every 14 to 22 days · winter - Climate
- 13–24 °C (55–75 °F)
- Humidity
- 50–70%
- Pet safety
- Pet-safe (non-toxic)
When and how to water
3 cm (1.2 in)
- Summer · Jun–AugEvery 6 to 8 days
- Winter · Dec–FebEvery 14 to 22 days
Use room-temperature water and let any excess drain. Never leave the pot sitting in standing water.
Adjust the timing for the light at the plant, the pot’s size and material, and the humidity indoors. Terracotta dries faster than glazed ceramic.
Light and placement
Bright light, some sun
Norfolk Island pine needs bright light and a little gentle direct sun, such as morning sun. Strong midday sun can scorch the leaves. Place it close to an east- or west-facing window.
Feeding
Feed your Norfolk Island pine every 14 days while it’s actively growing. Use a balanced liquid houseplant fertilizer at half the strength on the label, and only on soil that’s already damp. Feeding dry roots can scorch them.
When growth pauses, skip the fertilizer and let it rest.
Temperature & humidity
Climate13–24 °C (55–75 °F)
Humidity50–70%
Norfolk Island pine is comfortable between 13 and 24 °C (55–75 °F). It handles a cool room well, even in winter, as long as it stays above 5 °C (41 °F).
It does best at 50–70% humidity. It doesn’t need misting.
Norfolk Island pine as a living Christmas tree
Norfolk Island pines are sold in December as small living Christmas trees. Unlike a cut tree, it keeps growing as a houseplant after the holidays, so give it a houseplant’s spot from the day you bring it home.
Decorate it lightly. Heavy ornaments can bend the branches down for good. Lights that give off heat can damage the needles, so use LED strings, which stay cool and weigh little.
Keep it in the brightest spot you have. In weak light the top stops growing while the side branches carry on, which leaves a squat plant, and the branch tips go weak and droop.
Some needle drop after you buy it is normal while it gets used to indoor light. Lower branches that droop, brown and fall usually mean the soil was left too dry, so water thoroughly when the top 3 cm (1.2 in) feels dry and empty the saucer.
After the holidays, leave it where it is and keep watering when the top of the soil dries. It needs little feeding through winter.
Common problems
Yellowing, drooping, and dry edges often point to watering or drainage. Compare the signs before changing the routine.
Find what’s wrong
Toxic to pets?
No. Pet-safe.
Norfolk Island pine is non-toxic to cats and dogs. Safe to keep in a home with pets.
Pet-safety information in the JungleBook uses ASPCA reference data where available. It is reference information, not veterinary advice.
Common questions
How often should I water a Norfolk Island pine?
Water your Norfolk Island pine (Araucaria heterophylla) when the top 3 cm (1.2 in) of soil feel dry to the touch. In summer, that’s typically every 6 to 8 days. In winter, slow down to every 14 to 22 days.
Sources4 references
- Royal Botanic Gardens, Kew: Plants of the World OnlineTaxonomy · accepted name · classification
- North Carolina State University Extension Gardener Plant ToolboxIndoor light · temperature · soil · water · feeding · humidity · pests and symptoms
- Iowa State University Extension and OutreachLight · watering and drainage · feeding · temperature · humidity · browning and branch loss
- Royal Horticultural SocietyContainer medium · water by season · fertilizer · pests and diseases
Last reviewed: